Block Blast Shapes Guide — Every Piece Explained
Block Blast deals you three pieces at a time on an 8x8 board, and every piece belongs to a family: lines, squares, rectangles, corners, and a handful of awkward specialists. Strong players are not faster than everyone else — they simply recognise each family on sight, know exactly what it needs from the board, and keep the board ready to receive it. This guide covers every Block Blast shape you will meet, what each one does best, the space it demands, and the trays that quietly end runs. Learn the cast, and 'unlucky pieces' mostly disappear.
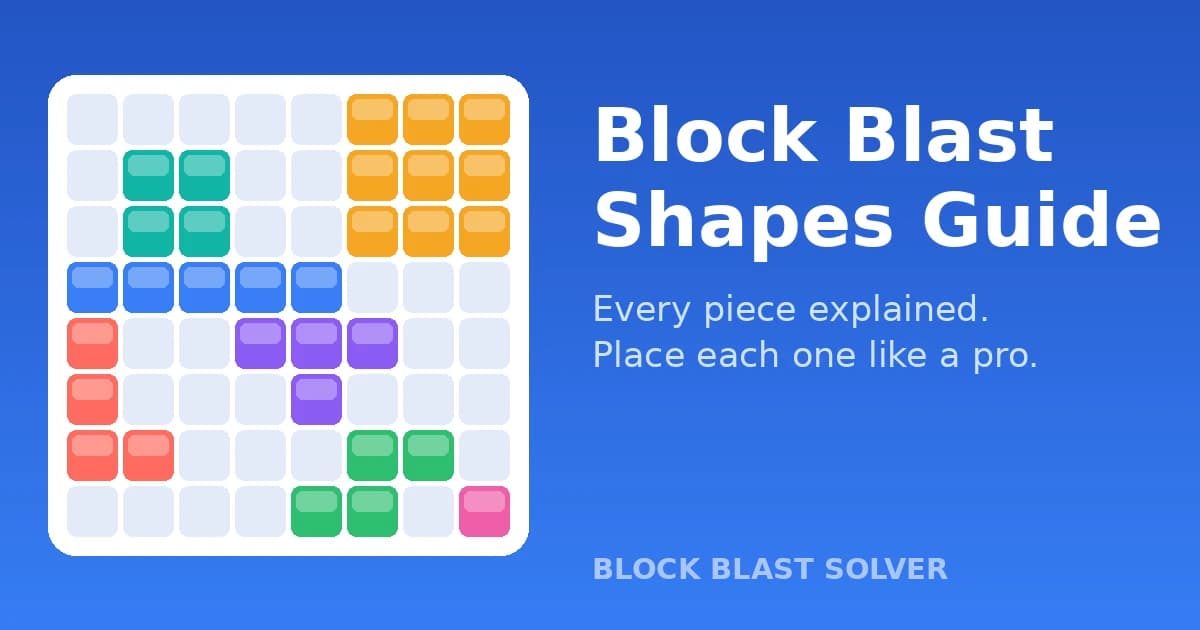
All Block Blast Shapes at a Glance
Pieces arrive in fixed orientations — Block Blast does not let you rotate a piece — so the same family turns up in several rotations and mirror images across different trays. Counted that way there are dozens of possible pieces, but they all come from the families below. The exact mix can shift slightly between game versions and modes.
- Lines — the single block, and straight pieces of two, three, four and five blocks, horizontal and vertical
- Squares — the compact 2x2 and the board-demanding 3x3
- Rectangles — solid 2x3 and 3x2 blocks
- Corners and L shapes — from the tiny three-block corner up to full 3x3 corner pieces, in every orientation
- T shapes — a three-wide bar with a stem, pointing in any direction
- S and Z zigzags — four-block steps that never sit quite flat
- Occasional variants — plus-shaped and other special pieces in some modes
Lines: The Smallest Pieces Do the Finest Work
The single block, the two-line and the three-line are precision tools. A single block is the only cure for a one-cell hole. A short line completes a row or column that is two or three cells short without spilling into the next line and breaking it. Small lines are also the safest way to spend a turn while the board is still opening up, because they cost almost no space.
The discipline is patience. The core advice in our Block Blast tips for beginners applies double here: never spend your smallest piece on the first gap you see. A single block dropped carelessly in the first minute becomes the missing piece in the tenth, when a one-cell hole is the only thing standing between you and a cleared row. If nothing needs finishing, park small pieces along an edge, where they build toward a future line instead of scattering across open floor.
Long Lines: Keep a Lane Open
The four-block and five-block lines are finishing pieces. A five-line slid into a prepared row clears it in a single move, and where that line crosses a nearly full column, it can clear both at once. Their weakness is built into their shape: a long line only fits in a straight, unbroken run of empty cells, and the longer the line, the rarer that run becomes on a busy board.
So keep at least one clean lane on your board. If every row and column is chopped into short segments by stray blocks, a five-line has no home, and one of the simplest shapes in the game becomes one of the most dangerous. A board with open lanes rarely fears a line. A board without them fears very little else — except the 3x3 square.
Squares: One Friend, One Board-Killer
The 2x2 square is the best-mannered piece in Block Blast. It stacks into corners without leaving gaps, two of them side by side advance two lines at once, and it fits almost anywhere a tidy board offers floor. Treat 2x2 squares as building material: they make flat edges, reliable corners, and the kind of board every other piece enjoys landing on.
The 3x3 square — nine blocks in one rigid piece — is the most dangerous shape in the game. Nothing else demands a completely empty 3x3 area, and no piece punishes a crowded board faster. The defence is built long before it arrives: keep one 3x3 zone, ideally a corner, empty at all times, and refuse to spend that space on anything else. The Block Blast Strategy Guide calls this your reserved zone, and it exists for exactly one tenant.
Rectangles: Solid, Honest, Awkward
The 2x3 and 3x2 rectangles are the middleweights of the cast: too broad to slip into gaps, too solid to wrap around existing blocks. Their flat sides are their strength — park a rectangle flush against a wall and it starts building two lines at the same time. Their weakness is position. Dropped in open floor, a rectangle becomes an island, and the space around an island is usually too broken for whatever arrives next. Rectangles belong on edges, never in the middle.
L Shapes and Corners: The Rescue Squad
Corner pieces run from the tiny three-block L up to full 3x3 corners, in every orientation. They are the only family that truly reaches into corners, which makes them the rescue squad of Block Blast: the dead corner cell that no line or square can touch is an L's home turf. Set an L across a nearly full row and a nearly full column, and it can clear both lines with a single placement.
That double clear is how combos work in Block Blast: one piece completing two lines at the same time. Corners produce more of these moments than any other family, so it pays to keep your corners clean and squared — ready for an L to land heroically, instead of forcing it into a jagged edge where half its value is wasted.
Give the small three-block L its own respect, too. It is compact enough for tight boards, it turns the corner nothing else can turn, and it works in every direction at once. You cannot choose when it arrives — but you can keep a corner shaped for it.
T, S and Z Shapes: Handle With Care
T pieces want two things at once — a lane for the bar and a slot for the stem — so they fit best where one line is being built across another. S and Z zigzags are the scruffiest pieces in the cast: nearly every placement leaves a step or a notch behind, and notches have a way of becoming holes that only a single block can fix.
The handling rule for every irregular piece is the same: lean it against a wall or against settled blocks, with its awkward side facing the boundary — never drop it in open floor just because it fits. Plus-shaped and other variant pieces appear in some modes; give them the same treatment. An irregular piece placed against an edge is structure. The same piece placed in the middle is the start of a fragmented board.
Which Block Blast Shape Is the Hardest to Place?
Ranked by how often they end runs, not by size alone:
- The 3x3 square — nothing else needs nine empty cells in one solid block.
- The five-line on a board with no clean lane — a simple shape with nowhere to lie down.
- Any large piece on a fragmented board — the piece is fine; the fragments are the problem.
- S and Z pieces late in a run — every notch they leave is one you no longer have room to fix.
Notice the pattern behind that ranking: shapes are only dangerous relative to the board they land on. On a board with lanes, edges and a reserved corner, every family in this guide has a home.
Shape Mistakes That End Runs
Spending small pieces the moment they arrive
A single block or short line spent on the first visible gap is usually needed somewhere else two trays later. Small pieces are finishing tools — hold them until a line is genuinely ready to close.
Raiding the 3x3 parking space
'Just this once' is how reserved corners die. The turn you borrow that space for a passing rectangle is the turn the 3x3 arrives — and a homeless 3x3 does not negotiate.
Dropping awkward pieces in open floor
An S or T placed in the middle leaves steps on every side; against a wall it leaves one. Fragmented space, not any single piece, is what actually ends most runs.
How to Plan Around Any Tray of Three
Work every tray in the same order: place the most demanding piece first — the biggest, the longest, or the one with the fewest possible homes — then fit the flexible pieces around it. Before placing anything, scan for the double clear, a row and a column that one corner or line can finish together. And after every placement, ask the only question that matters: if the 3x3 arrived right now, where would it go? If the answer is nowhere, your next placement must fix that before anything else.
When a tray looks impossible, run the position through the Block Blast Solver before you commit to a move. Watching where it finds homes for pieces you were about to give up on is the fastest shape education there is — within a few games you start seeing the same homes yourself.
Block Blast Shapes — Frequently Asked Questions
How many shapes are there in Block Blast?
There is no single fixed count, because the same families arrive in several orientations and mirror images, and the mix varies slightly between game versions and modes. Everything you will meet comes from the families in this guide — lines, squares, rectangles, corners, T pieces, zigzags and occasional variants — which together make dozens of distinct pieces.
What is the biggest shape in Block Blast?
The 3x3 square. At nine blocks it is the largest single piece in the standard game, and the only one that needs a completely empty 3x3 area — which is why experienced players keep a corner reserved for it at all times.
Can you rotate shapes in Block Blast?
No. Unlike some puzzle games, Block Blast gives you each piece in a fixed orientation, and pieces cannot be rotated before you place them. The same family returns in different orientations in later trays, so patience — and a board that works in every direction — replaces rotation.
What is the rarest shape in Block Blast?
Players most often name the 3x3 square, because it feels rare and has a habit of arriving at the worst moments. In practice the families cycle through the trays continuously; the 3x3 simply makes the strongest impression, because it is the one piece a crowded board cannot absorb.
More Block Blast Guides
Ready to try it on your board?
Upload a screenshot and get the exact moves in seconds.
Open the Solver